I
IIS
Guest
Test your bot in Teams
(following links will take you to official documentation, you can skip ahead and look for the steps - ways to publish)
Create a Teams app package and upload your app to the Teams client for testing. Learn how
Publish your bot for Teams
I have explained the process in detailed below. There are two ways to publish.
First way:
Create Manifest.json file and get a Icon for your Bot (Size: 192*192), create zip of these files.
The manifest.json file should look like this. Request you to change the mentioned values accordingly where it’s necessary.
Note: Please do not change below values in the Manifest JSON file. (This schema version might be obsolete in future so always check for latest one)
{
"$schema": "https://developer.microsoft.com/en-us/json-schemas/teams/v1.5/MicrosoftTeams.schema.json",
"manifestVersion": "1.5",
"version": "1.0.0",
"id": "116a4a55-b826-er4r-a42a-0034sdert345a",
"packageName": "com.bottested.teams.app",
"developer": {
"name": "Sai Teja Nagamothu",
"websiteUrl": "Proactive Messages Sample",
"privacyUrl": "Microsoft Privacy Statement – Microsoft privacy",
"termsOfUseUrl": "Microsoft Privacy Statement – Microsoft privacy" },
"icons": {
"color": "color.png",
"outline": "outline.png"
},
"name": {
"short": "Bottested",
"full": ""
},
"description": {
"short": "this is a test bot for learning purposes - Azure Bot Service support team ",
"full": "this is a test bot for learning purposes - Azure Bot Service support team "
},
"accentColor": "#FFFFFF",
"permissions": [
"identity",
"messageTeamMembers"
],
"validDomains": []
}
I have attached the zip file for reference and learning.
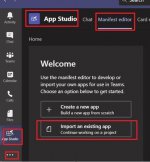
Once that’s done, import the zip file as shown below.
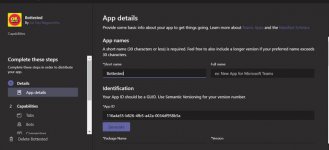
Once you import the .zip file you can further change or edit values.
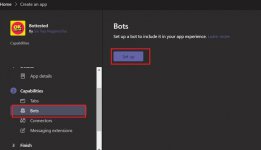
Once you entered the basic details connect your Azure Bot to this teams application like shown below.
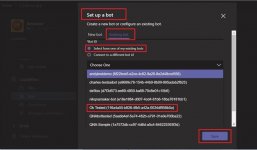
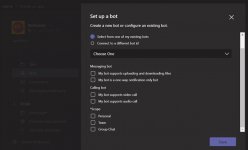
When you click on the set up Bot, you should see following and select the options accordingly.
You can choose the functionalities of the bot accordingly – check the boxes that apply to your bot.
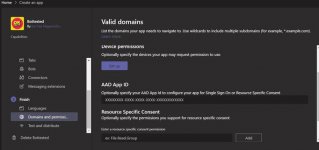
Additionally you can use the AAD features like SSO, Resource Specific content, Device permission etc. from AD level.
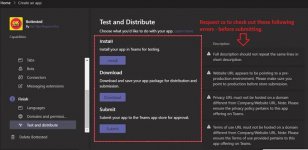
Finally you can do the following, as explained in the image.
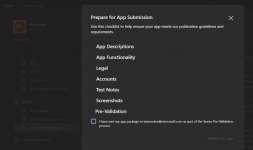
The bot will be submitted for approval, you can also send an email to teamsubm@microsoft.com with your .zip file for verification/ pre-validation.
Second way of doing is, rather than importing the manifest.json file directly create the app and fill the details as needed as shown below
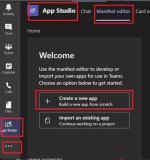
And the rest of the process is same.
Additionally the following articles are useful when you are publishing the bot to Org level, i.e. Manage your apps in the Microsoft Teams admin center.
Please add/ edit/ suggest/ question if I had missed anything or if it’s not clear somewhere.
Continue reading...
(following links will take you to official documentation, you can skip ahead and look for the steps - ways to publish)
Create a Teams app package and upload your app to the Teams client for testing. Learn how
Publish your bot for Teams
- Publish your bot as a Line of Business app in your organization's Teams Tenant App Catalog. Learn how
- Publish your bot as an app in the Teams App store. Learn how
I have explained the process in detailed below. There are two ways to publish.
First way:
Create Manifest.json file and get a Icon for your Bot (Size: 192*192), create zip of these files.
The manifest.json file should look like this. Request you to change the mentioned values accordingly where it’s necessary.
Note: Please do not change below values in the Manifest JSON file. (This schema version might be obsolete in future so always check for latest one)
- "$schema": "https://developer.microsoft.com/en-us/json-schemas/teams/v1.5/MicrosoftTeams.schema.json",
- "manifestVersion": "1.5",
{
"$schema": "https://developer.microsoft.com/en-us/json-schemas/teams/v1.5/MicrosoftTeams.schema.json",
"manifestVersion": "1.5",
"version": "1.0.0",
"id": "116a4a55-b826-er4r-a42a-0034sdert345a",
"packageName": "com.bottested.teams.app",
"developer": {
"name": "Sai Teja Nagamothu",
"websiteUrl": "Proactive Messages Sample",
"privacyUrl": "Microsoft Privacy Statement – Microsoft privacy",
"termsOfUseUrl": "Microsoft Privacy Statement – Microsoft privacy" },
"icons": {
"color": "color.png",
"outline": "outline.png"
},
"name": {
"short": "Bottested",
"full": ""
},
"description": {
"short": "this is a test bot for learning purposes - Azure Bot Service support team ",
"full": "this is a test bot for learning purposes - Azure Bot Service support team "
},
"accentColor": "#FFFFFF",
"permissions": [
"identity",
"messageTeamMembers"
],
"validDomains": []
}
I have attached the zip file for reference and learning.
Once that’s done, import the zip file as shown below.

Once you import the .zip file you can further change or edit values.

Once you entered the basic details connect your Azure Bot to this teams application like shown below.

When you click on the set up Bot, you should see following and select the options accordingly.

You can choose the functionalities of the bot accordingly – check the boxes that apply to your bot.

Additionally you can use the AAD features like SSO, Resource Specific content, Device permission etc. from AD level.

Finally you can do the following, as explained in the image.

The bot will be submitted for approval, you can also send an email to teamsubm@microsoft.com with your .zip file for verification/ pre-validation.

Second way of doing is, rather than importing the manifest.json file directly create the app and fill the details as needed as shown below

And the rest of the process is same.
Additionally the following articles are useful when you are publishing the bot to Org level, i.e. Manage your apps in the Microsoft Teams admin center.
- Manage your apps in the Microsoft Teams admin center
- Manage teams in the Microsoft Teams admin center
Please add/ edit/ suggest/ question if I had missed anything or if it’s not clear somewhere.
Continue reading...